- 1. Getting Started
- 2. General Billing
- 3. Helpdesk
- 4. E-mail
- 5. Networking
- 6. Security
- 7. Software - Windows
- 8. Downloads
- 1. How to contact our technical team and submit a helpdesk ticketAuthor: admin 28.01.16More
This article provides instructions on how to contact our Technical Team and submitting a Helpdesk ticket. To ensure we service your Helpdesk inquiries in a timely manner, please use our Helpdesk ticketing system. It allows you to correspond, easily track and manage your Helpdesk inquiry.
Your login details will be provided separately. If you haven't received one, please e-mail us at support@ipworks.net.au.
Available Downloads
IP Works Customer Support Services
Guide - How to contact our Technical Team and submit a Helpdesk ticket
By Web
Log-in to our helpdesk portal and submit on-line:
ipworks.net.au/helpdeskBy E-mail
For minor problems or to bring niggles to our attention you may like to e-mail:
helpdesk@ipworks.net.au
By Phone
With a system down, or if you urgently need assistance we are always happy to receive a call:
02 8199 7650
For emergency and after hours support, please call:
0430 219 473
Was this answer helpful ? Yes / NoViewed 616 Times
- 1. General BillingAuthor: admin 29.01.16More
What is the payment cycle for IP Works services? How does it work in timing terms?
IP Works Internet accounts run on a monthly cycle with invoices created on the same date each month (e.g., the 10th of every month).
The date your invoices are created is called the Date of Issue and is displayed on the first page of your invoice. Payment is due 28 days from the Date of Issue.
If you have automatic payments set up, your invoice will also include the date that IP Works will attempt payment, and if surcharges are applicable. All base monthly fees are charged in advance, in accordance with normal industry practice. This means we will collect payment for the subsequent month just a few days before that month begins.
Usage-based charges, such as call charges, data blocks, or excess fees, are charged monthly in arrears.
You should expect to see the following items on your invoice:
• Base monthly fees for the coming month (in advance).
• In-arrears charges for any usage-based fees incurred since the previous Date of Issue.
• Any other charges or adjustments made since the previous Date of Issue.How do my bills arrive?
Invoices are normally sent to the email address you nominated when you signed up with IP Works. We can also fax or post your invoices if required. To change between email, fax, or post, or to change your delivery address email customer services at support@ipworks.net.au
NOTE: While IP Works can post invoices, we discourage this for environmental reasons, and it will attract a $1.50 surcharge per invoice.
How can I pay for my IP Works Internet service?
IP Works offers a variety of different payment methods, including Credit Card, Direct Debit, and EFT.
When my IP Works Internet services is first connected, what bills can I expect - and when?
Because IP Works charges base monthly fees in advance, your first invoice must catch up with our regular billing cycle. To do this, your initial invoice will include the following charges:
• Your setup fee.
• If you purchased a router from us:
o The cost of your router.
o Freight (if the router was sent to you via courier).
o A credit card payment for the ADSL router and freight.
• Your first monthly fee.
• A credit card payment for the first monthly fee, and the setup fee (if you are paying by Credit Card).
• Your second monthly fee.If you are paying by Credit Card, we will charge for the setup fee and the first month of service on the day the first invoice is created. This means that your remaining balance will only be the second monthly fee - and this amount is not due until 28 days after invoice is created (Date of Issue).
When does my credit card get charged?
Credit Card payments are taken on a regular schedule. Generally 28 days after your invoice is created (Date of Issue) - and will also state the amount of the transaction. This information will appear on the first page of your invoice.
There are also some circumstances where an amount may be collected outside of the regular schedule:
• When your service is first connected, your setup fee and first monthly fee are charged immediately. This payment will appear on your subsequent invoice.
• If your financial institution declines your credit card payment, we will retry each day to collect payment - in case the card was temporarily over its credit limit. In this case, you may see the charge on your card a few days later than predicted (but still for the predicted amount). You will also receive a notification advising you of the failed attempt.
• If regular credit card payments were unsuccessful, just before we issue your next invoice we will try once more to collect the overdue amount. If this is successful, you will see this payment on the new invoice.
• If you have purchased equipment, e.g., a router.
All credit card payments will appear on your subsequent invoice, including the date and amount of the payment.Was this answer helpful ? Yes / NoViewed 527 Times
- 1. Fix Windows Desktop Search when it crashes or not showing resultsAuthor: admin 29.01.16More
What it fixes:
- Windows Search does not show results
- Windows Search is crashing
- Windows Search does not start
- General problems with Windows Search
Download
Was this answer helpful ? Yes / NoViewed 546 Times - 2. Internet Connection Problems - TroubleshootingAuthor: admin 29.01.16More
From time to time, you may experience a loss of Internet connectivity. 90% of connectivity problems is typically a temporary condition that you can easily fix yourself.
Reset your Modem/Router
- Unplug all devices from every phone socket, including your modem, line filters/splitters, telephones, fax machines, pay TV boxes and EFTPOS terminals.
- Unplug the power from your router (if you have one). Wait for 1 minute.
- Plug the modem back in and wait until it has fully restarted. This can take up to a few minutes.
- If you still have no Internet connectivity, restart your computer and then repeat step 2.
- If you still experience internet issues, please let us know by the following:
- By e-mail, send to helpdesk@ipworks.net.au - this will automatically create a help desk ticket and we will respond to it as soon as possible.
- By phone, contact 02 8199 7650
Was this answer helpful ? Yes / NoViewed 553 Times - 3. How to Create RDP Shortcut IconAuthor: admin 28.02.19More
Windows 10:
- Select the “Start” button and type “Remote“.
- Open the “Remote Desktop Connection” application.
- Select the “Show Options” arrow located in the bottom-left corner of the window.
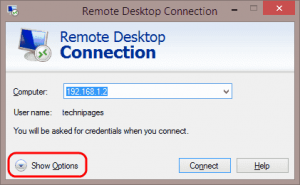
- View each tab and ensure the settings are configured as desired. All of the options under these tabs will be saved when you create the shortcut.
- Once everything looks right, jump back to the “General” tab. Ensure the “Computer” field is filled in. Select “Save As…”

- Select the location you wish to save your RDP icon to. Give the connection a name, then Select “Save” when ready.
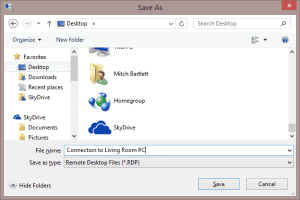
- Your RDP icon is saved and is now ready to access quickly when needed.
Was this answer helpful ? Yes / NoViewed 514 Times - 4. Windows 10 64bit, can't type in search bar / start menuAuthor: admin 13.08.19More
Windows 10 64bit, can't type in search bar / start menu
- Press Win + R (to open Run )
- Copy paste and press enter to run this program. "C:\Windows\system32\ctfmon.exe".
Was this answer helpful ? Yes / NoViewed 315 Times
- 1. Set up your email account using the Outlook Wizard - Outlook 2013/2016Author: admin 29.01.16More
Method 1:
- Open Outlook 2013/2016 or Outlook 2010. When the Outlook Startup Wizard opens, select Next. On the E-mail Accounts page, select Next.If the Wizard didn't open or you want to add an additional email account, on the Outlook toolbar select theFile tab.

- Select Add Account.
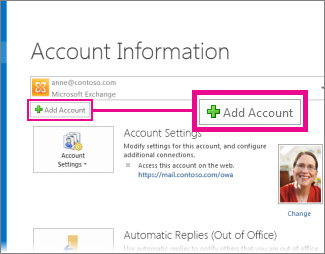
- On the Auto Account Setup page, enter your name, e-mail address, and password, and then select Next.
- Select Finish.
Method 2
- From the start Outlook 2013 / 2016
- On the Welcome Screen, click Next
- On the Add an Email Account screen, choose Yes and click Next.
- On the Add Account screen, enter the following information:
Your Name: [yourname]
Email Address: youremail@address.com.au
Password and Retype Password: [yourpassword] - Click Next
- Outlook will Autoconfigure, click Finish when done.
Was this answer helpful ? Yes / NoViewed 613 Times - Open Outlook 2013/2016 or Outlook 2010. When the Outlook Startup Wizard opens, select Next. On the E-mail Accounts page, select Next.If the Wizard didn't open or you want to add an additional email account, on the Outlook toolbar select theFile tab.
- 2. Set up your email account using the Outlook Wizard - Outlook 2007Author: admin 29.01.16More
All you need to do is type your email address and password to set up Microsoft Outlook 2007 to access your Office 365 or other Microsoft Exchange-based email. Outlook uses a process called Autodiscover to automatically find your settings and set up an Exchange connection to your account.
Set up an Exchange connection to your email in Outlook 2007
- Open Outlook 2007. If the Outlook 2007 Startup Wizard opens automatically, on the first page of the wizard click Next.
- On the E-mail Accounts page of the wizard, click Next to set up an email account.
- If the Outlook 2007 Startup Wizard doesn't open, on the Tools menu, click Account Settings. In theAccount Settings dialog box, on the E-mail tab, click New.
- On the Auto Account Setup page, Outlook may try to automatically fill in the Your Name and E-mail Address settings based on how you logged on to your computer. If the settings are filled in and they're correct, click Next to have Outlook finish setting up your account.
- If the settings in the Auto Account Setup page aren't filled in or aren't correct, do the following:
- Type the correct settings based on the information that was provided to you by the person who manages your email account.
- If the name in the Your Name box isn't correct, you may need to reset the options on the Auto Account Setup page before you can edit your name. To reset the options, select and then clear the check box next to Manually configure server settings or additional server types.
- If the settings in the Auto Account Setup page aren't filled in or aren't correct, do the following:
- After you click Next on the Auto Account Setup page of the wizard, Outlook performs an online search to find your email server settings.
Outlook 2007 displays a message that asks you to allow a website to automatically set up your account. Outlook must connect to that website periodically to make sure your account is up to date. If you don't want to see this message every time Autodiscover runs, select Don't ask me about this website again, and then click Allow.
Outlook 2007 continues setting up your account. You'll be asked for your user name and password before Outlook 2007 can connect to your account. Make sure you enter your full email address (for example, tony@contoso.com) as your user name. You may be prompted to enter your user name and password several times before you connect.
For more information or help with setting up your e-mail, please contact our Helpdesk on +612 8199 7650.Was this answer helpful ? Yes / NoViewed 494 Times - 3. Outlook Continues to Prompt You for Logon CredentialsAuthor: admin 29.01.16More
When you use Outlook to try to connect to a Microsoft Exchange server, you may be prompted to provide a user name, password, and domain name. However, after you provide this information, Outlook may repeatedly prompt you to provide your credentials again.
Was this answer helpful ? Yes / NoViewed 1083 Times - 4. Delete a name from the Auto-Complete listAuthor: admin 29.01.16More
The Auto-Complete List is a feature which displays suggestions for names and email addresses as you start to type them in the To, Cc, and Bcc boxes. These suggestions are possible matches from a list of names and email addresses from the email messages that you have sent.
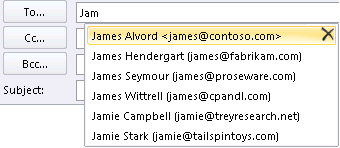
There might be entries that you want to remove, such as entries that are no longer current or accurate. To remove unwanted names, do the following:
Select the unwanted name or email address by using the UP ARROW or DOWN ARROW key.
- Click
 or press DELETE.
To remove all names from your Auto-Complete list, do the following:
- Click the File tab.
- Click Options.
- Click Mail.
- Under Send messages, click Empty Auto-Complete List.
Was this answer helpful ? Yes / NoViewed 537 Times - Click
- 5. Set up Outlook / Office 365 for Mac 2011Author: admin 29.01.16More
- Open Outlook for Mac 2011. On the Tools menu, click Accounts. If this is the first account you're creating in Outlook 2011, under Add an Account, click Exchange Account.
If you've previously created an email account for a different email address, in the lower corner of the Accountsdialog box, click "plus + sign", and then click Exchange.
- On the Enter your Exchange account information page, type your email address.
- Under Authentication, make sure User Name and Password is selected.
- In the User name box, type your complete email address. In the Password box, type your password.
- Make sure Configure automatically is selected, and then click Add Account.
- After you click Add Account, Outlook will perform an online search to find your email server settings. In the dialog box that asks if you want to allow the server to configure your settings, select the Always use my response for this server check box, and then click Allow.
- If Outlook is able to set up your account, you'll see the account you set up in the Accounts dialog box. Close the Accounts dialog box. If Outlook isn't able to set up your account, see the next section in this article.
Was this answer helpful ? Yes / NoViewed 483 Times - 6. How to change your Office 365 e-mail passwordAuthor: admin 29.01.16More
- Sign-in to Office 365 portal https://portal.office.com.
- Enter your email address account and password
- Go to Settings

- Go to Office 365 Settings

- Go to Password

- Type the old Password and enter your new Password
- Click Save
Was this answer helpful ? Yes / NoViewed 497 Times - 7. Hyperlinks blocked in Outlook - Hyperlinks are not working in OutlookAuthor: admin 29.01.16More
Error Message (Depending on Outlook version):
Your organization's policies are preventing us from completing this action for you. For more info, please contact your help desk.
Or
This operation has been cancelled due to restrictions in effect on this computer. Please contact your system administrator.
To resolve this issue, download the following link:
Was this answer helpful ? Yes / NoViewed 528 Times - 8. Download and install Office for Mac using Office 365 for businessAuthor: admin 30.05.16More
This guide applies to customers on Office 365 Business Premium and installing Microsoft Office on a Mac.
Download and install Office 2016 for Mac
- Sign in to the Office 365 portal with your work or school account.
- Go to Settings
 > Office 365 (under My app settings) > Software.
 - On the Office page page, under Install Office 2016 for Mac, select Install to begin downloading the installer package.
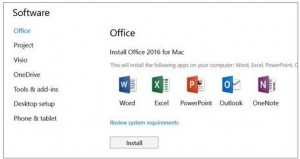
- Once the download has completed, open Finder, go to Downloads, and double-clickMicrosoft_Office_2016_Installer.pkg. (The name might vary slightly.)
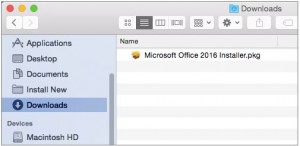
- On the first installation screen, select Continue to begin the installation process.
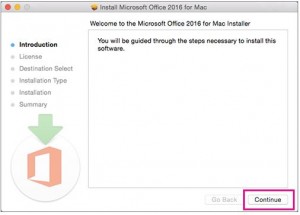
- Review the software license agreement, and then click Continue.
- Select Agree to agree to the terms of the software license agreement.
- Review the disk space requirements, and then click Install.
- Enter your Mac login password, if prompted, and then click Install Software. (This is the password that you use to log in to your Mac.)
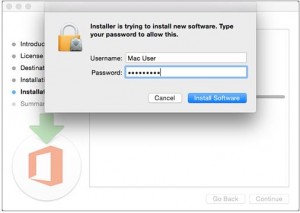
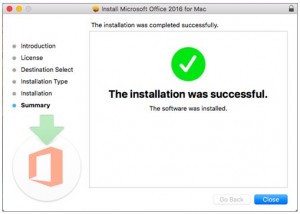
- The software begins to install. Click Close when the installation is finished.
Launch an Office for Mac app and start the activation process
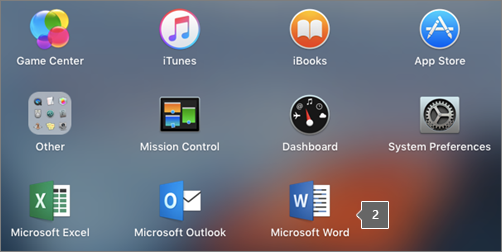
- Click the Launchpad icon in the Dock to display all of your apps.

- Click the Microsoft Word icon in the Launchpad.
- The What's New window opens automatically when you launch Word. Click Get Started to start activating.
Was this answer helpful ? Yes / NoViewed 533 Times - 9. Office 365 Support and Recovery Assistant - Fix issues with Office appsAuthor: admin 15.02.18More
The Support and Recovery Assistant app can help you identify and fix several issues for the following apps and services.
- Office setup
- Outlook
- Outlook for Mac 2016 or Outlook for Mac 2011
- Mobile devices
- Outlook on the web for business
- Microsoft Dynamics CRM Online
- Exchange Online
- OneDrive for Business
Download - Fix Outlook and Office 365 problems with Microsoft Support and Recovery Assistant for Office 365:
Known to fix:
- When trying to add a new Outlook account, you get persistent "Something Went Wrong" message. Additional notes "Something went wrong and Outlook couldn't setup your account."
Can also look in to disabling 2-pass authentication.
Was this answer helpful ? Yes / NoViewed 1140 Times - 10. Setup Office 365 on your phoneAuthor: admin 13.06.16More
Setup on your iOS phone
- Tap Settings
- Select Mail, Contacts, Calendars, then select Add Accountnear the top of the right-hand column
- Tap Add Account…
- Tap Microsoft Exchange
- On the account setup window, enter the following for each field
Field Value E-mail username@domainname (.com.au/.com…) Domain [leave blank] Username username@domainname (.com.au/.com…) Password [provided separately] - In a few moments, a new field titled “Server” will appear. This will be automatically pre-populated with the right information. If not, type “office365.outlook.com”
- Choose which items you would like enabled. It is recommended to that all services are turned “ON” and then tap “Save” to finish.
Setup is complete. Email and calendar data (if enabled) are available in the appropriate apps.
download guide
Click on below link to download the iOS guide:
IP Works How To - Setting up Office365 on iOS
Setup on your Android phone
Samsung Devices
- TapSettings > Accounts > Add account > Email.
- Type your full email address, for example john@yourdomainname.com.au, then type your password, and then tap Next
- Select Exchange
- Depending how the Office 365 administrator in your organization set up your account, you might receive a message about additional security features. Select OKto continue
- Once the device verifies the server settings, the Account Optionspage opens. Accept the defaults or select the options for how you want to receive and send your mail, and then tap Next. (You may need to scroll down to see Next.)
- On the Set up emailpage you can change the name of your account. When you're finished tap Done
Base version of Android
- Tap Settings
- Tap Accounts
- Tap + Add Account
- Tap Microsoft Exchange ActiveSync
- Enter your Email Address and Password
- If you see a Domain\Username field, enter your full email address, for example john@yourdomainname.com.auIf the Doman and Username fields are separate, enter your email address in Username and leave the Domain
- If you see a server field, enter office365.com
- Tap Next and Next until you see your Inbox.
Download guide
Click on link below to download the Android guide:
Was this answer helpful ? Yes / NoViewed 506 Times
- 1. How to setup VPN connection - IP Works Managed ConnectionAuthor: admin 29.01.16More
This article provides instructions for configuring client VPN services for IP Works Managed Connection.
Your VPN details will be provided separately. Please contact IP Works Technical Support for assistance.
Please click to download our How-To Guide here.
Was this answer helpful ? Yes / NoViewed 561 Times - 2. Internet Connection Problems - TroubleshootingAuthor: admin 29.01.16More
From time to time, you may experience a loss of Internet connectivity. 90% of connectivity problems is typically a temporary condition that you can easily fix yourself.
Reset your Modem/Router
- Unplug all devices from every phone socket, including your modem, line filters/splitters, telephones, fax machines, pay TV boxes and EFTPOS terminals.
- Unplug the power from your router (if you have one). Wait for 1 minute.
- Plug the modem back in and wait until it has fully restarted. This can take up to a few minutes.
- If you still have no Internet connectivity, restart your computer and then repeat step 2.
- If you still experience internet issues, please let us know by the following:
- By e-mail, send to helpdesk@ipworks.net.au - this will automatically create a help desk ticket and we will respond to it as soon as possible.
- By phone, contact 02 8199 7650
Was this answer helpful ? Yes / NoViewed 553 Times
- 1. CryptoLocker virus encrypting your files (Ransomware)Author: admin 29.01.16More
CryptoLocker/Wall is a file encrypting virus that will encrypt all your videos, pictures and personal documents. Before you realise, the program that encrypts your file will demand some ransom money. The victim has 96 hours to pay before all data is lost and destroyed.
To confirm you have been infected with the virus, there are two files that will be placed on your desktop:
1) DECRYPT_INSTRUCTIONS.html
2) DECRYPT_INTSTRUCTION.txt
With similar contents:
"WARNING we have encrypted your files with CryptoLocker virus. Your important files (including those on the network disks, USB, etc): photos, videos, documents, etc. were encrypted with our CryptoLocker virus. The only way to get your files back is to pay us. Otherwise, your files will be lost. Caution: Removing of CryptoLocker will not restore access to your encrypted files."
There are tools that can remove CryptoLocker completely. However, as of writing this notice, none can decrypt the files that has already been encrypted by the virus. Our recommendation is to follow the Malwarebytes "Removal Instructions" here:
https://forums.malwarebytes.org/index.php?/topic/134420-removal-instructions-for-cryptolocker/
For business and corporate, re-imaging the infected machine is the best course of action.
As a preventative measure, please download and install CryptoPrevent from FoolishIT.
If you happen to be a victim of this virus, feel free to contact us on (02) 8199 7650.
Was this answer helpful ? Yes / NoViewed 510 Times
- 1. Fix Windows 10 Brightness on LaptopsAuthor: admin 27.04.16More
While Microsoft offered a free upgrade to Windows 10. There's a few bugs that is affecting Laptop/Notebook users.
The user will experience some issues with adjusting display brightness. Increasing it to it's full 100% brightness still looks like its at 70%.
To fix this:
Step 1: From the search functionality type Device Manager. Open the Device Manager application.
Step 2: Navigate to the Display adapters entry in the structure. Expand the option and right-click on the driver. Select Update Driver Software from the contextual menu.
Step 3: In the resulting interface menu select Search automatically for updated driver software.
Step 4: Windows 10 will then use the established Internet connected to download the necessary drivers.
Windows will automatically install the driver and provide a Windows has successfully updated your driver software message. It will also show details of the hardware that the driver pertains to.
If the above didn't find any updates, please proceed with fix below:
Alternative Fix
Step 1: From the search functionality type Device Manager. Open the Device Manager application.
Step 2: Navigate to the Display adapters entry in the structure. Expand the option and right click on the driver. Select Update Driver Software from the contextual menu.
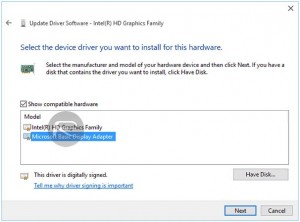
Step 3: In the resulting interface menu this time select Browse my computer for driver software.
Step 4: Select Let me pick from a list of drivers on my computer.
Step 5: Under the Show compatible hardware heading, select Microsoft Basic Display Adapter from the list. Select Next to continue.
Was this answer helpful ? Yes / NoViewed 512 Times
- 1. Avaya IP Office - Softphone

